


Overview
The Waiau Toa / Clarence is one of the best long river trips in New Zealand, more so because it’s not overly challenging whitewater. It offers fabulous scenery, edible wildlife, no highways or bridges, and a near-wilderness experience. It has amazing geology and is a living laboratory of the influence of plate tectonics on the New Zealand landscape.
The river is a relatively easy paddle, which is easy enough for intermediate paddlers and interesting enough for more advanced ones.
It is a trip to savour, not one to rush through. In normal conditions, a comfortable trip can be done in 5 river days. With spring flows and longer days, a 3 river-day trip is achievable. Adverse conditions, walking approaches or side trips can make trips of 7 or more days.
There are long flat sections, wave trains, short steep rapids and occasional serious hazards that remind you not to be complacent.
Logistics between start and finish can be time-consuming, but you can use commercial operators to assist.
A warning: geological time includes now
The 2016 Kaikoura earthquake significantly changed many of the features in the river. Bedrock emerged from gravel, huge slips formed new rapids, singular rocks created sieves in ‘easy’ rapids, landslides create river-wide sieve fields, campsites and huts were wiped out. In many places the recently disturbed rock is sharp and mobile; hazards are changing with each flood event, as the river slowly settles into its ‘new normal’ between siesmic events.
The message is clear: no matter what you read below, on the day you need to read the river. Take the time to scout and always have an eddy that you can reach in sight.
Credits
Thank you to Hugh Canard, for the info from his ‘Guide to the Clarence/Waiau-Toa’. To Martin Robertson for building the original page, and providing updates in January 2022. To Dan Clearwater for extensive re-formatting and general edits in 2023, 2024 and 2026. To Justin and Olivia Szanto for additional hazard info 2026.
View Larger Topographic Map
When to paddle?
The Waiau Toa / Clarence has been paddled in all season, all flows and all weather conditions. In general, spring to early summer is when most people time their trip. Later summer risks too little water, and winter is often too cold for most. Read the following sections to see what time of year will likely suit you most.
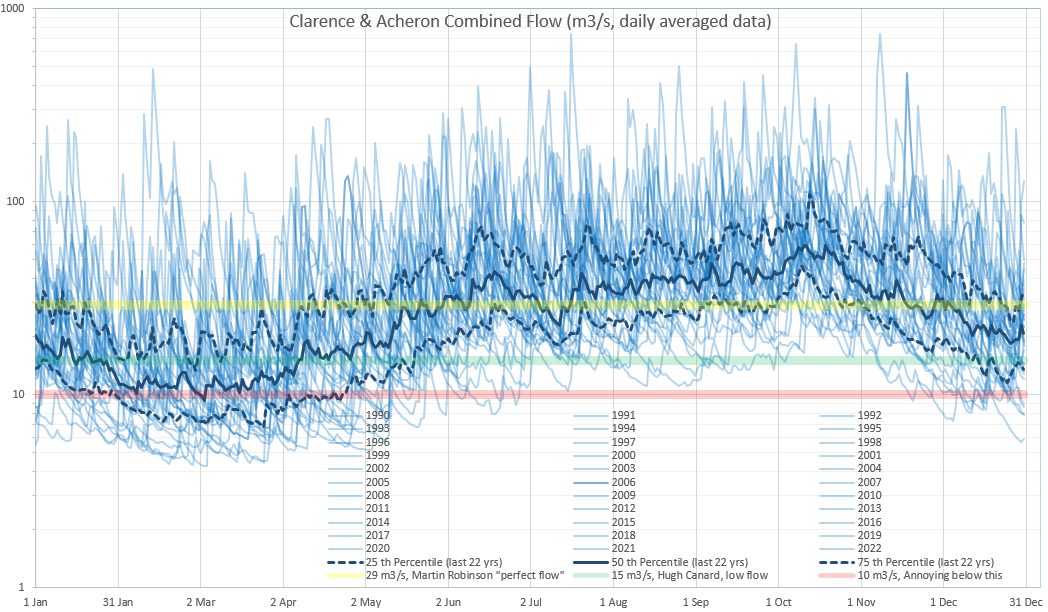
Picking the right river flows
There are two relevant gauges, and you need to add the numbers together to get the combined Clarence flow at the put-in. All the flows in this post are combined flows at the put-in. .
Clarence at Jollies (ECAN) and the Acheron (NIWA)
(The lower Clarence Valley gauge was destroyed by the 2016 Kaikoura earthquake and the replacement is not calibrated to flows)
What flow is best?
The Clarence is bony but navigable by packrafts at almost any flow. The Clarence can flood but doesn’t get more technically difficult, just offers potential for much more extended swims as the laterals and bluffs become more powerful.
Low flows: <5 cumecs
A combined flow of less than 5 cumecs is really low. Low flow means a much slower trip, more paddling in the flat bits, more rocks to avoid., and having to carefully pick your braid otherwise you’ll be beached. Rafts won’t like such low flows so you’ll have the river to yourself.
Recommended packrafting flows: 15 – 30 cumecs.
At this flow range, expect a 5 day trip, as suggested in this guide.
Medium flows: Around 35 cumecs.
In December 2020 it was packrafted by several groups at flows of 35 cumec to Snowgrass. The Chute rocks were largely submerged making it an easy passage.
High flows: > 50 cumecs
The Chute rapid will push grade IV.
Very high flows: >100 cumecs
The same December 2020 packrafting group then got hit by a storm. After waiting out a flood the group paddled Snowgrass Hut to SH2 in a single day at over 100 cumec (combined) at the put-in. It was very pushy with grabby eddy lines, big holes and large waves. As it gets higher, the chicken run lines start to vanish, and portaging at river level can become difficult. Solid grade III skills are required – you’ll be using them more than you think.
At high flows, avoiding a swim becomes more important, as they can be lengthy and hazardous – excellent self-rescue and team rescue skills are essential.
What time of year for the right flows?
Roger Parkyn contributed a combined flow analysis to help you with the year-round seasonality and deciding when to book your annual leave if traveling from outside the region.
Weather
The Clarence is situated between two high mountain ranges that lie across the prevailing westerlies.
- It can be very hot.
- It can be very, very cold.
- It can snow.
- It can rain.
This applies at any time of the year. Snow can fall at Christmas. The location between two high ranges, the elevation, and the distance from the ocean means that the Clarence Valley can experience some very severe frosts.
But mostly it can blow.
A southerly is manageable but cold, but a northerly or north-westerly can be extremely violent with alarmingly ferocious gusts. N and NW winds blow upstream until you pass Gibson Stream. Progress can then be very slow. Most injuries in this river have been caused by wind. This applies on the river and in camp. If it blows it’s often prudent to simply stop somewhere sheltered and sit it out. When westerlies threaten there can be grey skies with no wind then in literally a second you will be overwhelmed by a wind gust that showers you with tennis ball-sized stones. It’s easy to lose a packraft in such circumstances. Laden 4.2m rafts have been capsized and then lifted 50m up the side of the gorge into trees. Deflate and secure your gear.
This is no exaggeration and is based on Hugh Canard’s personal experience. Please exercise caution until the weather plays its hand. In New Zealand you can expect the weather to change…
How many days to spend?
This depends on so many factors, so you’ll have to decide by yourself.
On a good weather forecast, with spring (high-ish) flows, raft groups commonly make a 3 day trip. Booking a commercial shuttle ahead of time, they drive to the Acheron confluence on the friday night, then start early and paddle until late afternoon on Sunday. Monday finishes mid afternoon, with a long drive using pre-positioned cars to collect the remaining vehicles, then onwards to home.
A more comfortable schedule, paddling at recommended flows and allowing for a bit of R&R in the evenings makes for 5 days on the river. Shuttling and logistics could add an extra day.
Headwinds can slow you down, meaning longer days, or even being late. Extreme headwinds or floods can force you to hunker down and wait.
Higher flows and motivated, skilled paddlers can often combine sections into longer days.
Whatever the situation, make sure you consider extra food and time into your plan.
Logistics
Shuttle
Most river parties opt for a shuttle of some description, since there is decent vehicle access to both ends of the river. It’s a long trip and therefore it’s a long and possibly complicated shuttle.
The Shuttle involves travel via Hanmer Springs over Jack’s Pass (don’t be tempted by Jollies Pass) to the Acheron confluence. There is a DoC shelter and loo there.
- Hanmer to Christchurch – 140km
- Christchurch to Clarence Bridge – 240km
- Hanmer to Put-in – 30km (allow 45 minutes by car)
- Clarence to Hanmer – 234 km
A self-supported two-car shuttle for a party of 4-5 can involve 938 km for one vehicle, so most parties use either gullible friends or commercial shuttles. The whole route has been Bike-rafted by those with the time, inclination and gear.
There are commercial services which will suit those short of time. Ben at Clarence River Rafting and Hugh at Raft Rentals NZ do Shuttles for a fee that can be quite cost-effective for large groups. Either dropping you off to paddle back to your car or collecting your car and returning it to the take out.
Human-powered approaches
Packrafters have a range of options to combine human-powered approaches with the river. You can hike in and out via side routes, climb mountains, and bike trails. Camping is relatively easy as it’s a dry part of the country. Pore over a map there are all sorts of options for all tastes.
The more common foot approaches are part of the “East West route, Molesworth Station” which arrive about 1/4 the way through the classic river section.
From the west (Molesworth Station)
Starting at Molesworth Sation on the Awatere Valley Road, head up Robinson Creek or any other variations to Lake McRae(hut). Continue to Forbs Hut or Palmer Hut to put on. Look at the DoC Molesworth brochure for details.
From the East: Kahutara Stream/Bushy Saddle
There is a 4WD road from the Kahutara River bridge. A locked gate prevents general vehicle access, but apparently you can ask DoC for the Key.
The 4WD road goes via Bushy Saddle and Driving Spur over the Seaward Kaikouras to Forbes Hut and Quail Flat. It continues even to Goose Flat (but this last section is closed for vehicles as of August 2017)
Or via Mt Taupae O Uenuku
This is the highest peak in the south island, away from the main divide, making it a classic objective. It is a basic mountaineering objective when there is snow on the route, requiring ice axe and crampons. In summer, its a rocky slog.
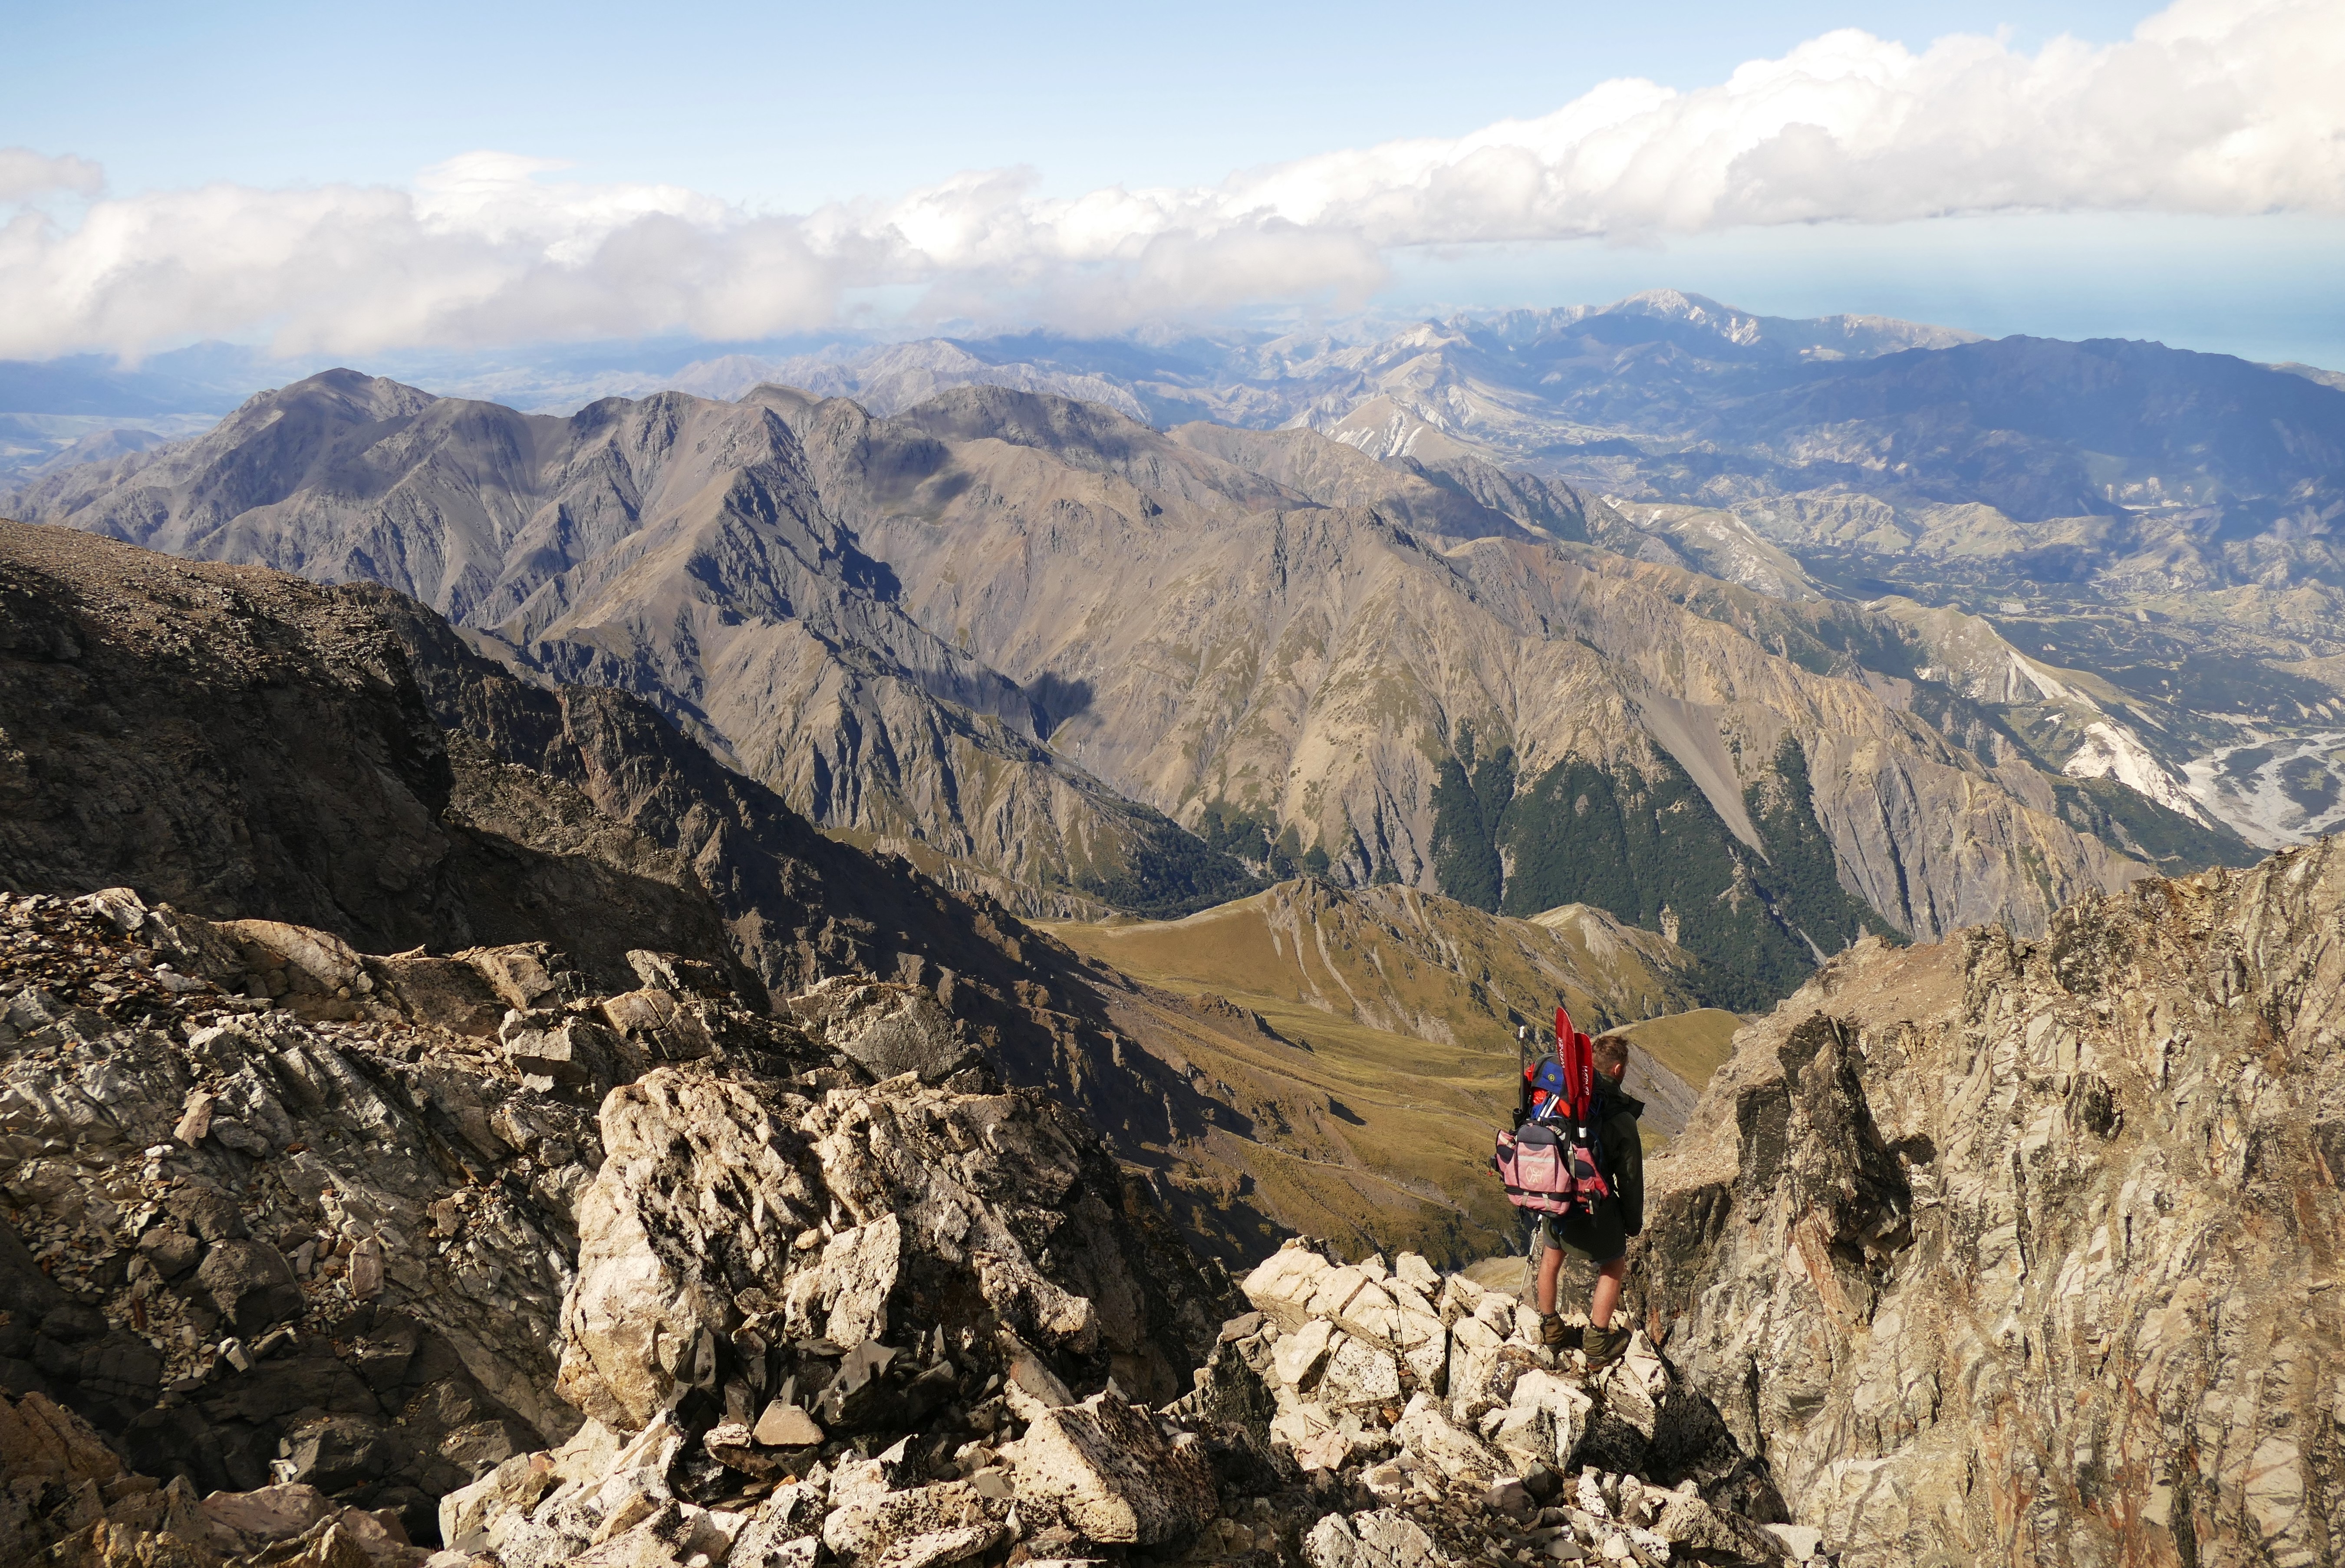
The GodZone adventure race once began in the Awatere, climbed Mt Taupae O Uenuku, then decended to the Waiau Toa / Clarence where athletes packrafted to the highway.
Land tenure isn’t always obvious in this region, so do your research on the DoC website, and at the Herenga a Nuku / Walking Access Commission maps.
Accommodation options
Most trips are self-supported, camping along the way as you feel inclined. There are new DoC huts along the river now, making it possible for packrafters to live in luxury and carry less gear. However, headwinds can be a major factor, which can mean you might not make it to your desired hut. So it is generally reccomended to carry camping gear.
At the time of writing, there are huts at Palmer Stream (12 bunks), Seymour Stream (10 bunks) and Snowgrass Flat (12 bunks). Despite the map, there is no Gibson Hut or Goose Flat Hut (destroyed by fire in 2021) . Let that be a reminder to check with DoC immediately before your trip! You will have to plan your days with some care as the hut spacing isn’t ideal for river parties.
The first day is devoid of trees but there is good hammock camping from Big Eddy on down.
Campsites for small parties are abundant, just be mindful of a very real rockfall hazard in the gorges that has been elevated by the slow spalling of rock since the Kaikoura EQ.
The Clarence can be paddled from Lake Tennyson (200km), and if the flows are up a little (30-40 cumecs) you can put where you like when the access road comes near to the river. However, the classic trip begins at the Acheron confluence.
The Acheron itself can be paddled for a day to reach the Clarence. The Acheron is Grade 1 and 2 with a 100m portageable Grade 4 rapid just downstream of a wire cage and just above the historic bridge near the Clarence confluence. Don’t run this rapid without scouting it. At lower flows it is more dangerous as it’s very deep and undercut.
Fire awareness
Although it is really tempting to have a campfire on a trip like this, make sure you “Check its all right before you light…” www.checkitsalright.nz That site is by Fire Emergency New Zealand, and takes into account the rules and the weather forecast to give you guidance on whether it is legal (or even sensible) to light a campfire.
In general, this area is extremely dry. Embers floating away can easily start new fires and strong winds can make them uncontrollable in less than a minute.
In the past, river runners have been responsible for huge wild fires, which needed multiple helicopters to put out, and destroyed at least 1 hut.
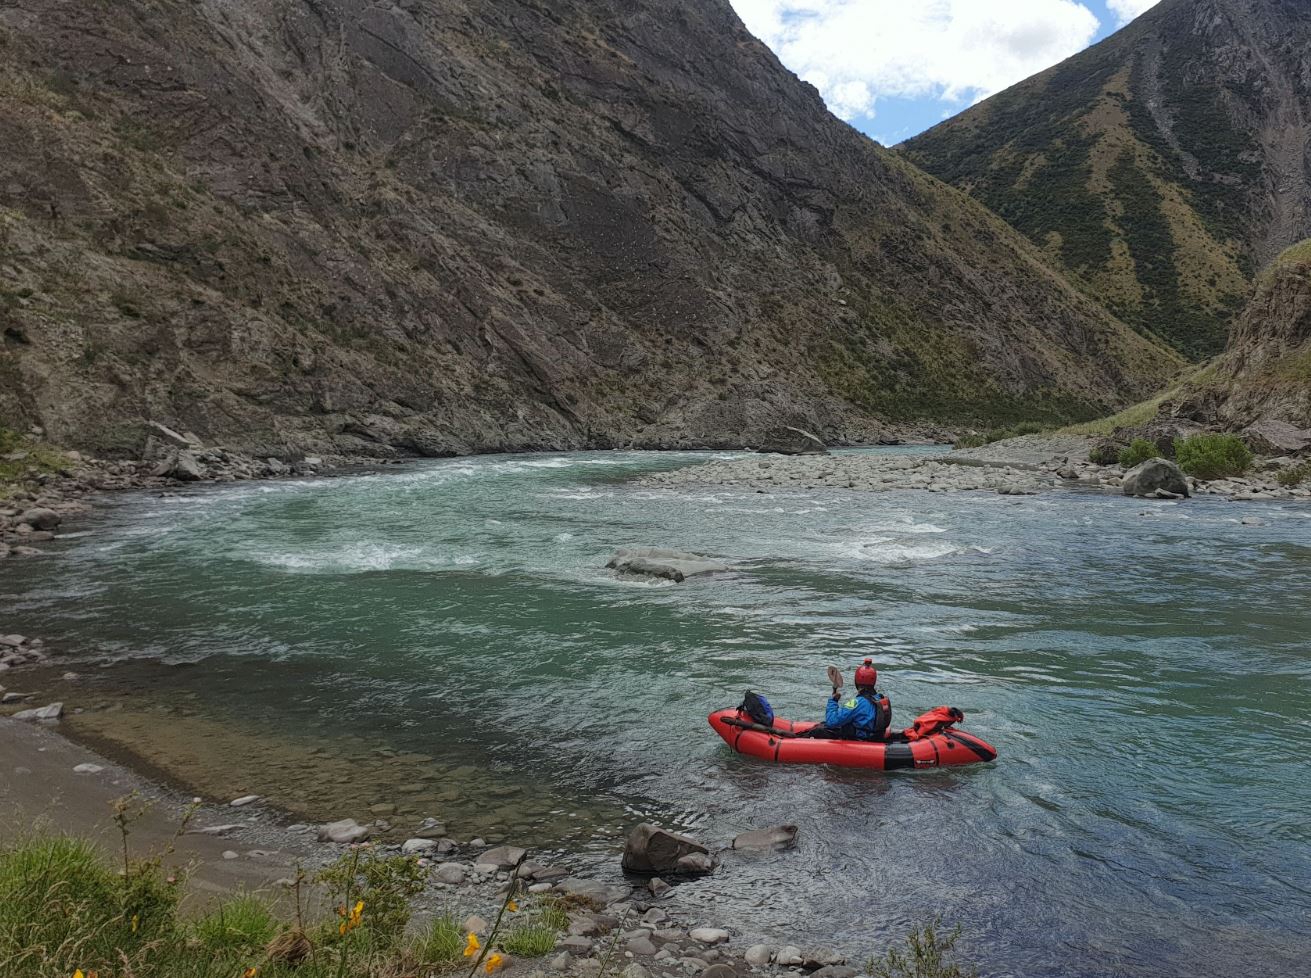
Paddling the Waiau Toa / Clarence
In general, some rapids have awkward willows, so keep a wary eye out. There are many bluffs and a few rocks where you don’t expect them, and silty waters make it harder to spot.
The notes below are at recommended packrafting flows, at a comfortable pace for intermediate paddlers. They assume starting by about 9am on the first day. A later start will mean you should aim to camp near Stoat Stream on river L and possibly R. Go any further, there are no safe campsites, and you might have to portage the Chute as darkness falls…
As written elsewhere, storms, winds and changing rapids can significantly delay or speed up your trip.
Day 1: Acheron confluence via Bullen Gorge to Big Eddy (II/III)
River distance: 26-31 km
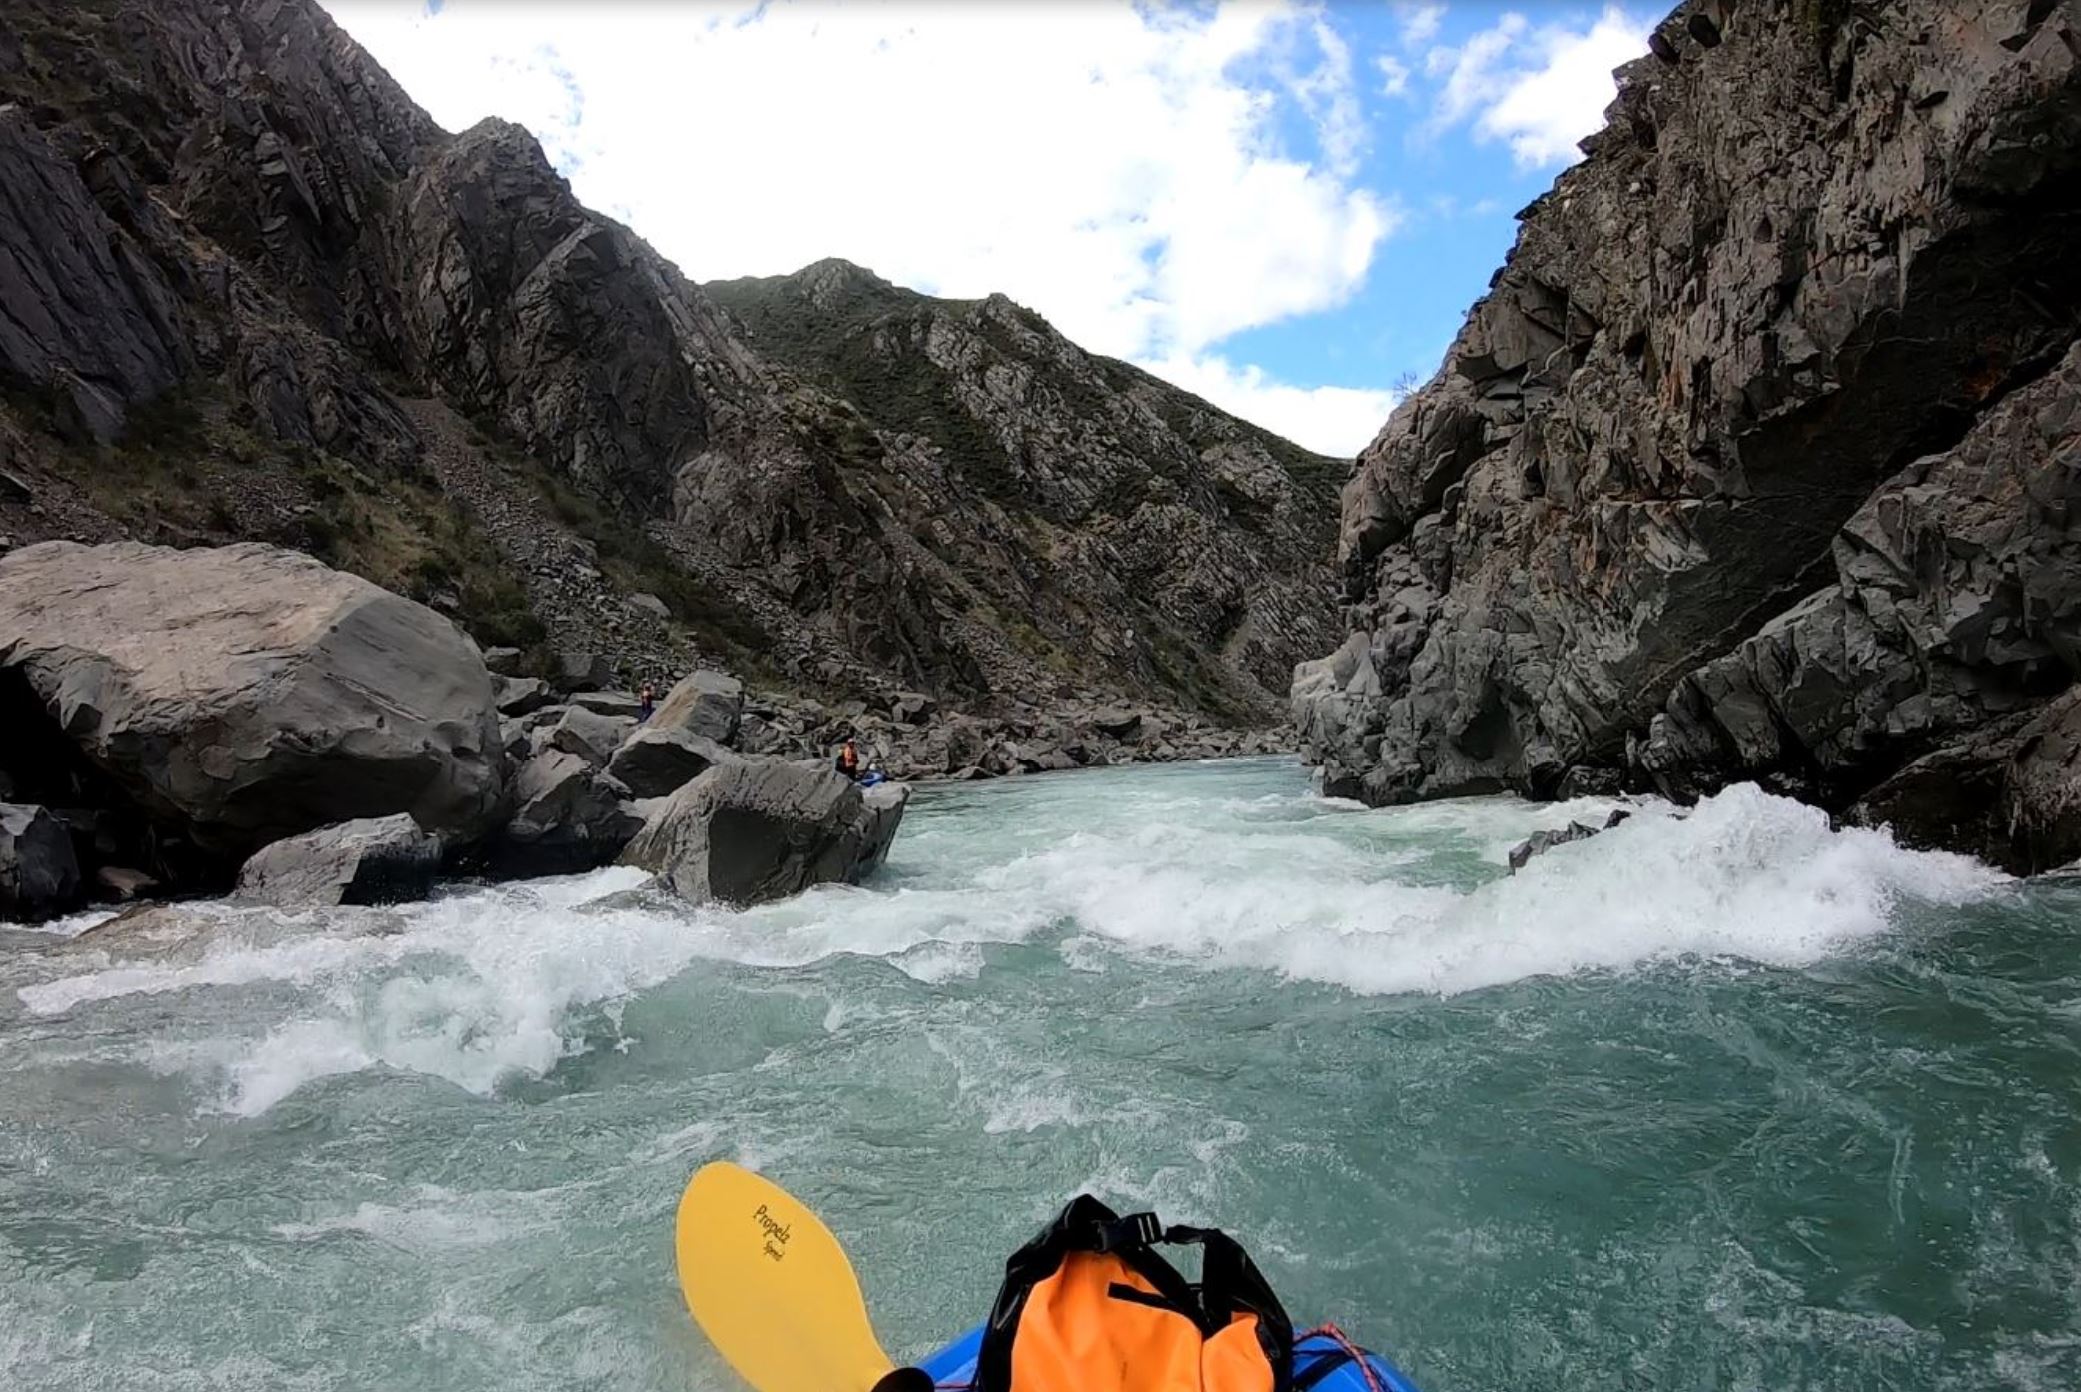
The braided upper river gives way to Bullen Hills Gorge (II+/III) after an hour or two. Valley walls close in and things start to get interesting.
After a right-hand bend in the river a “Big Rock” appears midstream. It can pin the unwary so avoid its undercut upstream side. At least 50m upstream of the Big Rock, you should get out on the true left and go to scout ‘The Chute’ rapid.
WARNING: Chute update March 2024 from Hugh Canard
The rapid has changed recently, and was the scene of an accident that resulted in a tragic drowning in early 2024.
This drop has hardly changed in the past 50 years. The risk is that anyone who has run the river before 2024 will confront a very different drop from the past. Hugh would have just said “I’ve done it 17 times, just run on the left” and that would have been very bad. The large centre rock has gone. All parties should treat this drop with care as it’s probably changing with erosion and going to change more radically during freshes and floods.
The hazard (which was the site of the fatality) is a long spike of rock on the left which will pin your boat.
From above, the rapid is not easy to scout from your packraft. Lateral currents abound as you approach so be positive and don’t drift. Land-based scouting should be considered mandatory for packrafters. Approach cautiously when picking your spot to stop and scout – stop early and move closer if needed, rather than trying to get as close as possible on the first go. Portaging/scouting on the left is possible, over large sharp and jagged rocks. This is fairly strenuous – and poses its own hazards from slips and falls.
At lower flows, <10-15 cumecs, The line at the time of writing is to enter from the right. At lower flows there’s a small drop, then move left towards the center over a second drop. Don’t head in flat out. Slower is better. If you enter on the left, by purpose or accident, you’ll need momentum towards the right to avoid the serious hazard.
If anyone gets pinned, treat the area with huge caution. Get a rope to the person whilst they’re still in the boat and at all costs keep your feet up at the surface if you happen to find yourself in the water. This advice applies to all rivers, but especially this one, after the 2016 earthquake!!
The fatality occured when the person jumped in to assisted a pinned raft. He just dissapeared between the rocks and was drowned.
It will take a metre of cover over the rocks before the needle rock will disappear, but it will still represent a hazard. That would be 25+ cumecs. The drop now is quite technical at lower flows and just a Grade 2-3 rapid at higher flows. It is hazardous on river L at most flows.
We suspect future floods will make changes over time. Treat this drop with caution. It’s no longer just a single drop with a clear line.
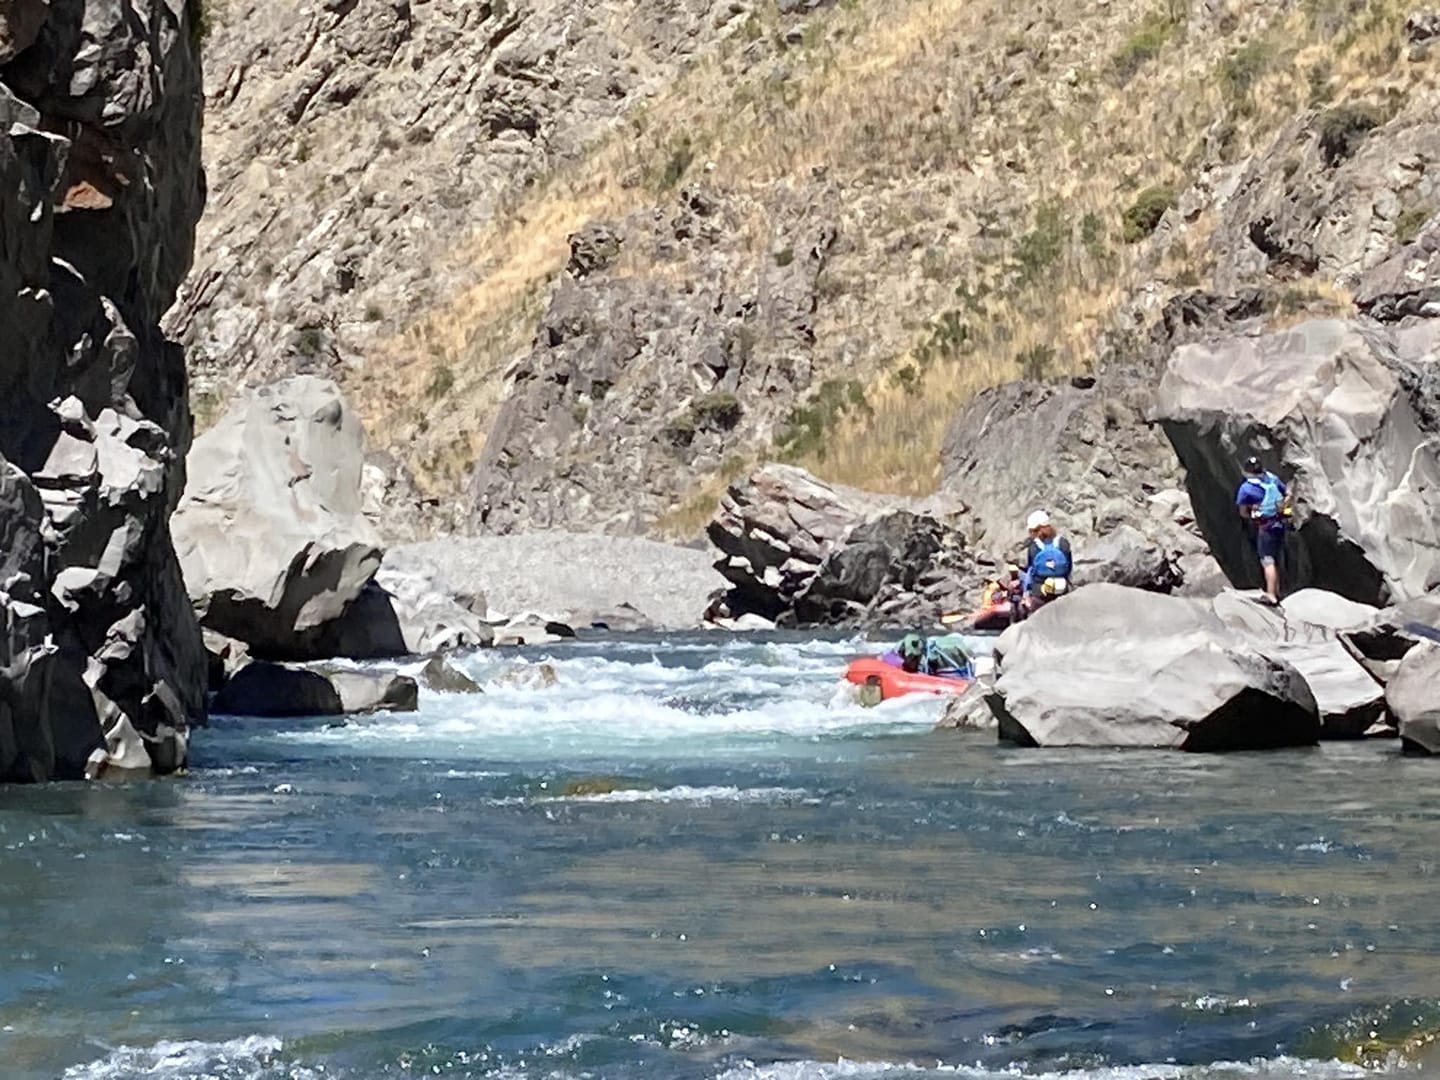
Portages are easy on river left. View the Chute Portage (river left) on the Southern Alps Photography site.
For the night: Most parties camp as soon as practicable after the Bullen Hills Gorge. Options are Tinline Creek (exposed), the Willows or Big Eddy.
Day 2 – Big Eddy via Second Gorge to Quail flat (II)
River distance: 35-40 km
This is a long day with easy water, then a massive gorge (“The Second Gorge”) near The Observatory (peak). After that, the valley opens out.
For the night: Forbes (aka Seymour) Hut (10 bunks) also has good camping nearby. Another 1.5km down river, there is good camping at Quail Flat, with its historic pioneer homestead.
Day 3: Quail flat to Snowgrass Hut in the Third gorge (II/III)
River distance: 45km – slow in a headwind!
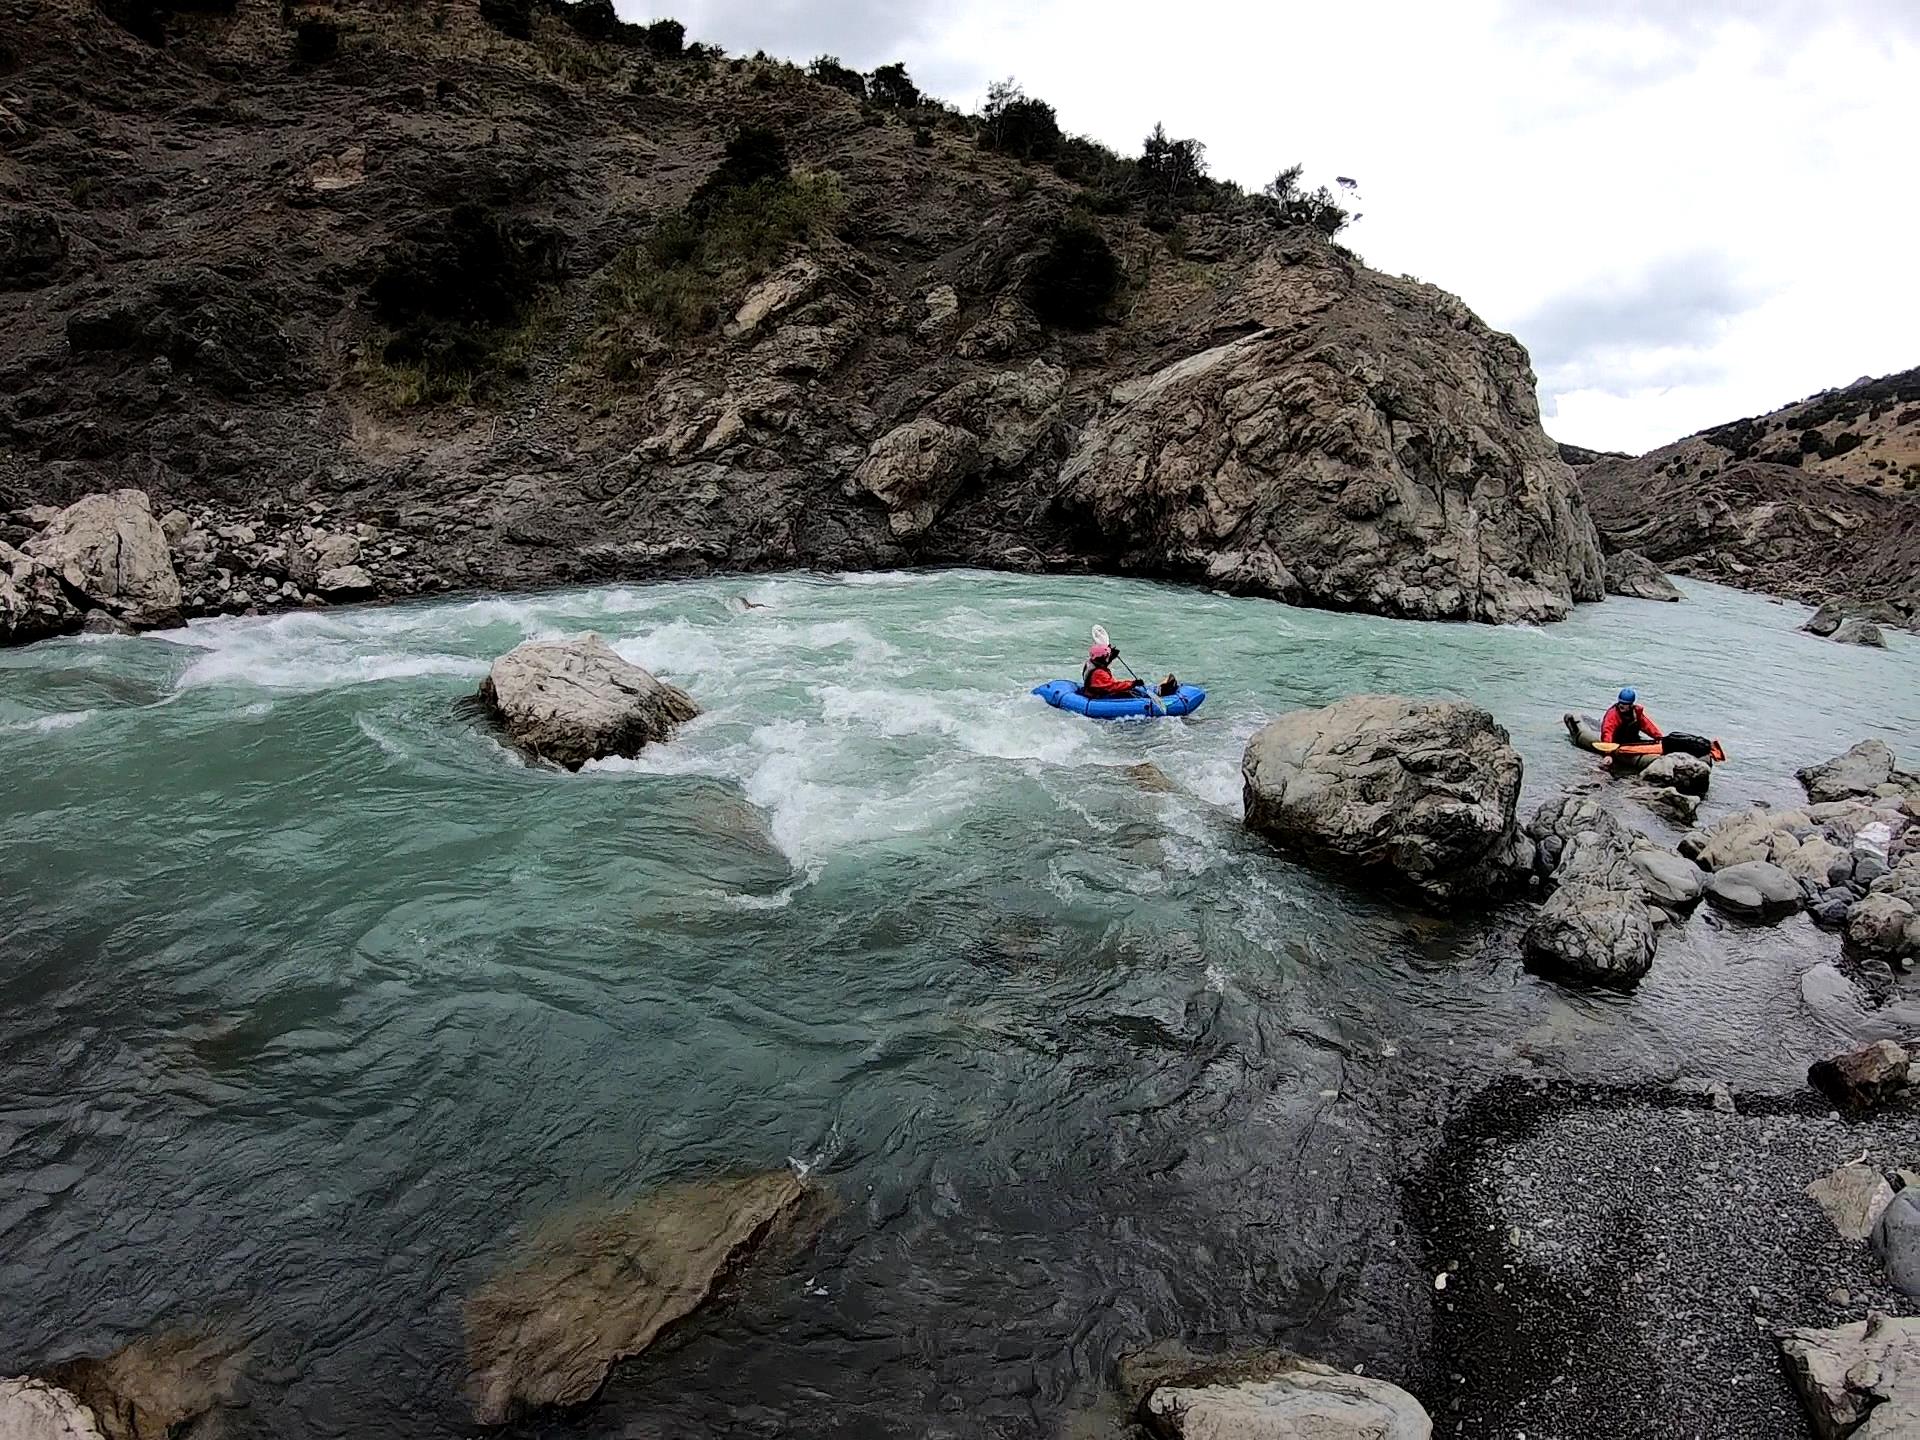
The river continues in a similar character of open flats, braid rapids and sharp corners with buffer waves for the next 35ish kilometers.
One notable exception is the “Wrap Rock”, where a huge boulder is sitting smack-dab in the middle of the main flow, where the wide river-bed narrows a little. Most of the flow goes straight into the rock, creating a large buffer wave, which is difficult to avoid. Huge gear rafts have flipped here, and several other rafts/packrafts have been pinned. Depending on the flow, good paddlers can run this rapid, but the line & timing is tricky and there are consequences! As you near Chimney stream, keep your eyes peeled for a house-sized boulder on the horizon line. This is the warning rock – fairly easy to avoid without much hazard. Then a few hundred metres downstream, the “wrap rock” appears on the horizon. It doesn’t look like much from a distance, which is why it has taken so many people by surprise. Its easy to portage on the left – which is the best option for most people.
At the end of the wide open flats before the Third Gorge (aka Sawcut Gorge), the notable rapids begin.
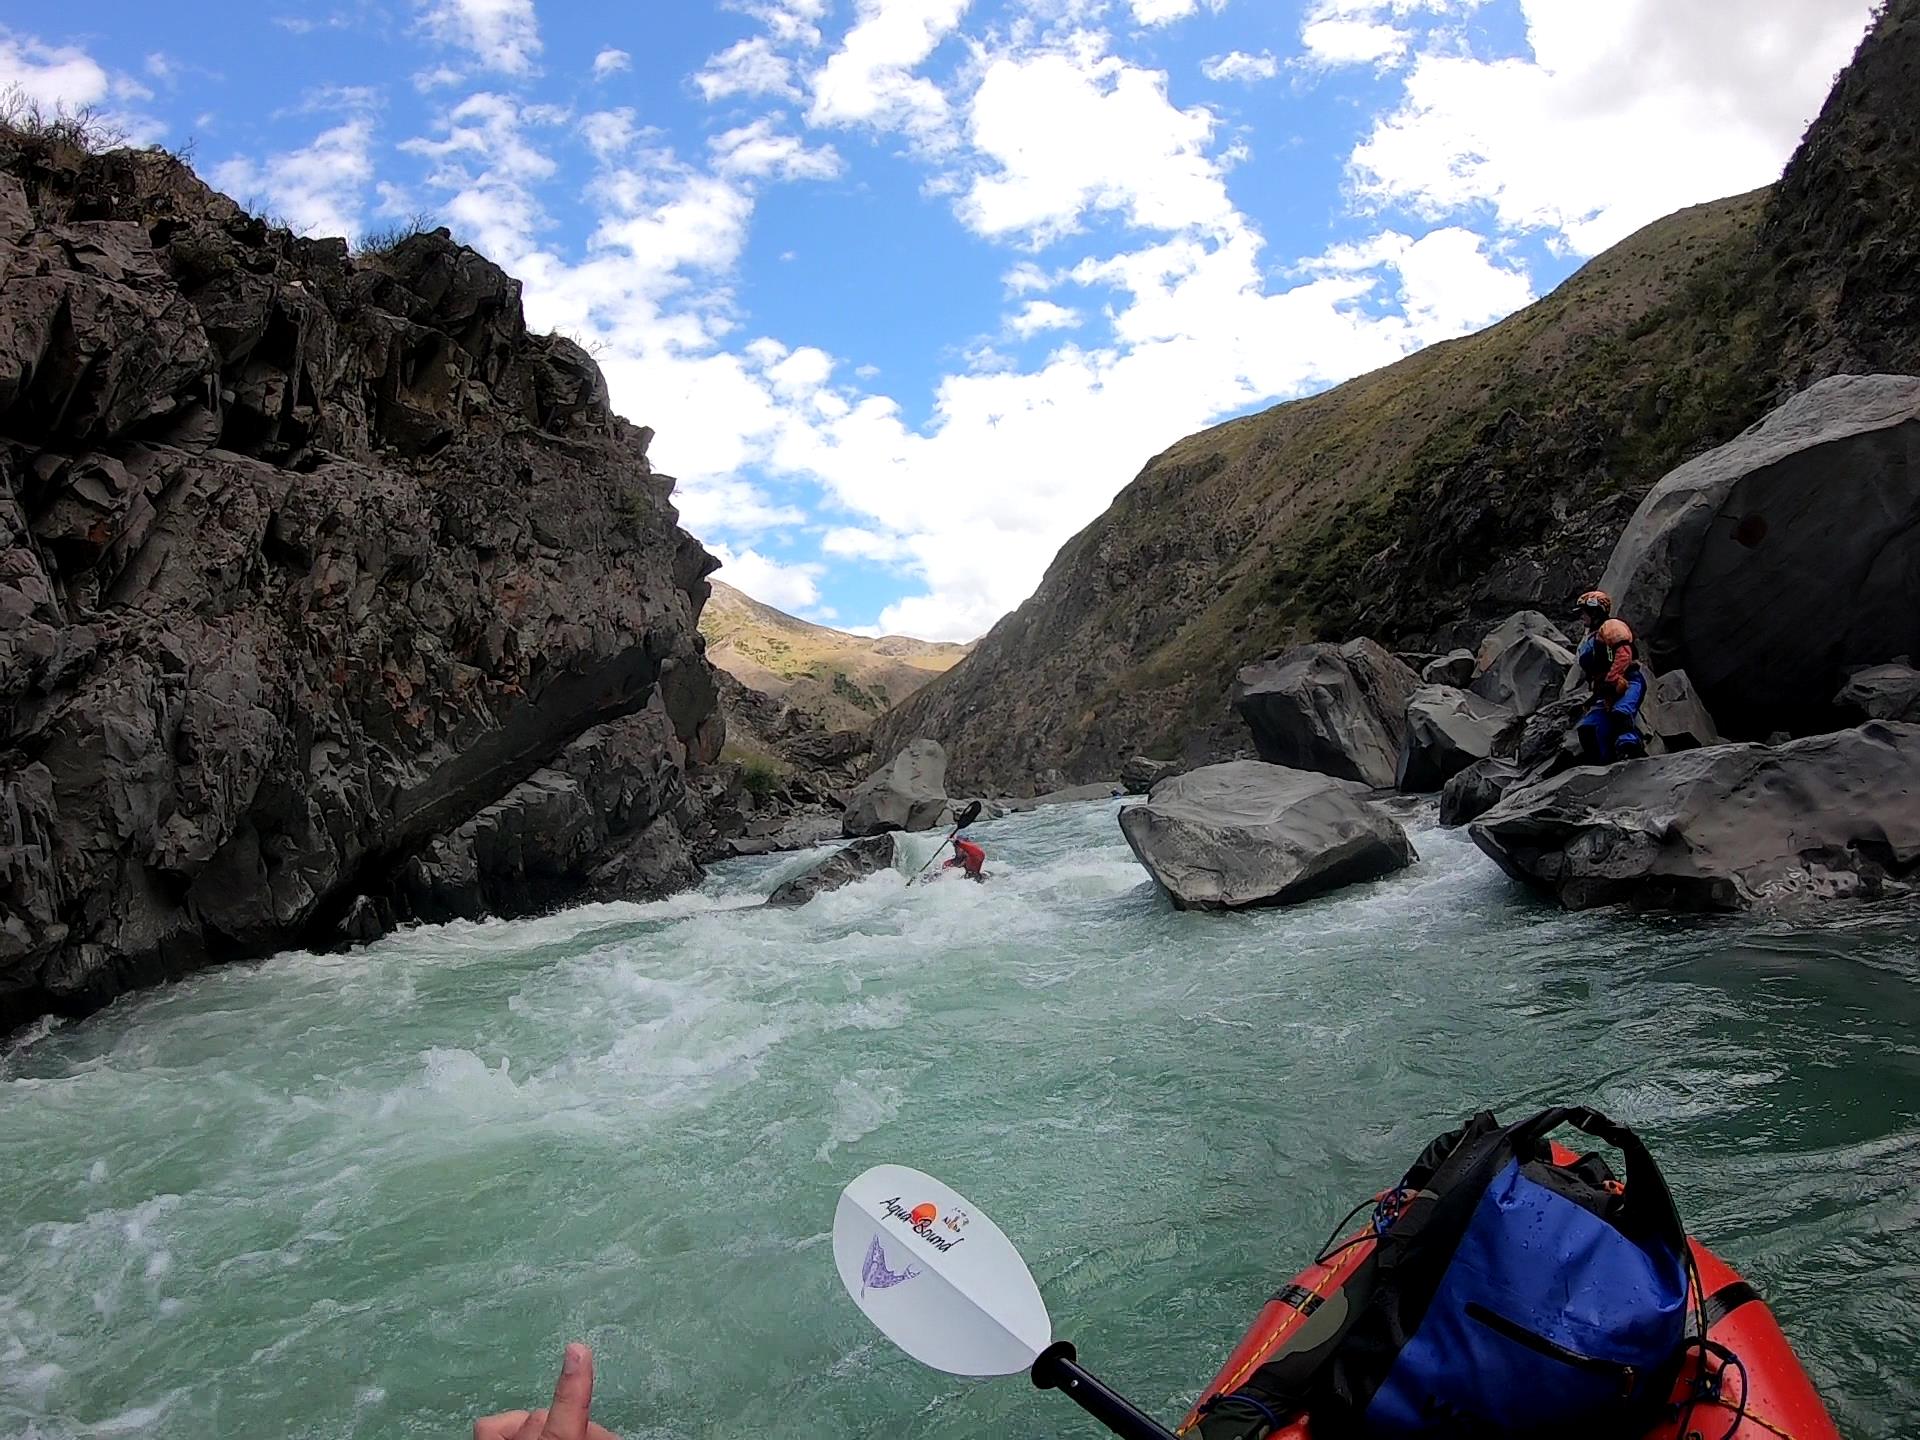
Here, the 2016 Kaikoura earthquake created a rockfall that dammed the river. Eventually, the river breached the dam and eroded a new channel. This formed the “Dambuster rapids” which are a series of grade II+/III rapids. Assume these rapids will be constantly changing. It’s a good plan to scout them as the rock is very sharp. At most flows, its good to scout from river left with a portage or chicken run river right.
At high flows, the chicken run dissapears – better to portage/scout what you can from the right, but know you’ll probably have to run the last bit of the rapid.
The “Jawbreaker” rapid is just after Jam Stream courtesy of its bouldery bedload. It is a straight run grade III rapid with large waves. The main III feature is easily avoided and many will ask “Was that it??”. View a photo of Jawbreaker rapid on the Southern Alps Photography website.
In this gorge, the rock is so shattered and unstable from the 2016 Kaikoura earthquake that large rockfalls occur during rain. Be vigilant!
“Son of Jawbreaker” soon follows, and from now on you should stick to the left hand side of the river until past Lonely Dog Rapid….
WARNING: Lonely Dog Rapid
This rapid is below Jawbreaker and a few minutes above Snowgrass Hut. Huge amounts of earthquake debris have accumulated right across from a large slip off the left. At low to medium flows it’s a sieve of rocks spread over 150m x 150m right across to river R. It includes some big pieces, one of which forms a big slot/hole right where the flow takes you. This hydraulic has high-sided rafts and swamped large gear rafts. You can’t see it from a raft so packrafts will get done over in here. It’s not worth attempting to boat-scout as the slope is convex and you can’t see what’s there until it’s too late.
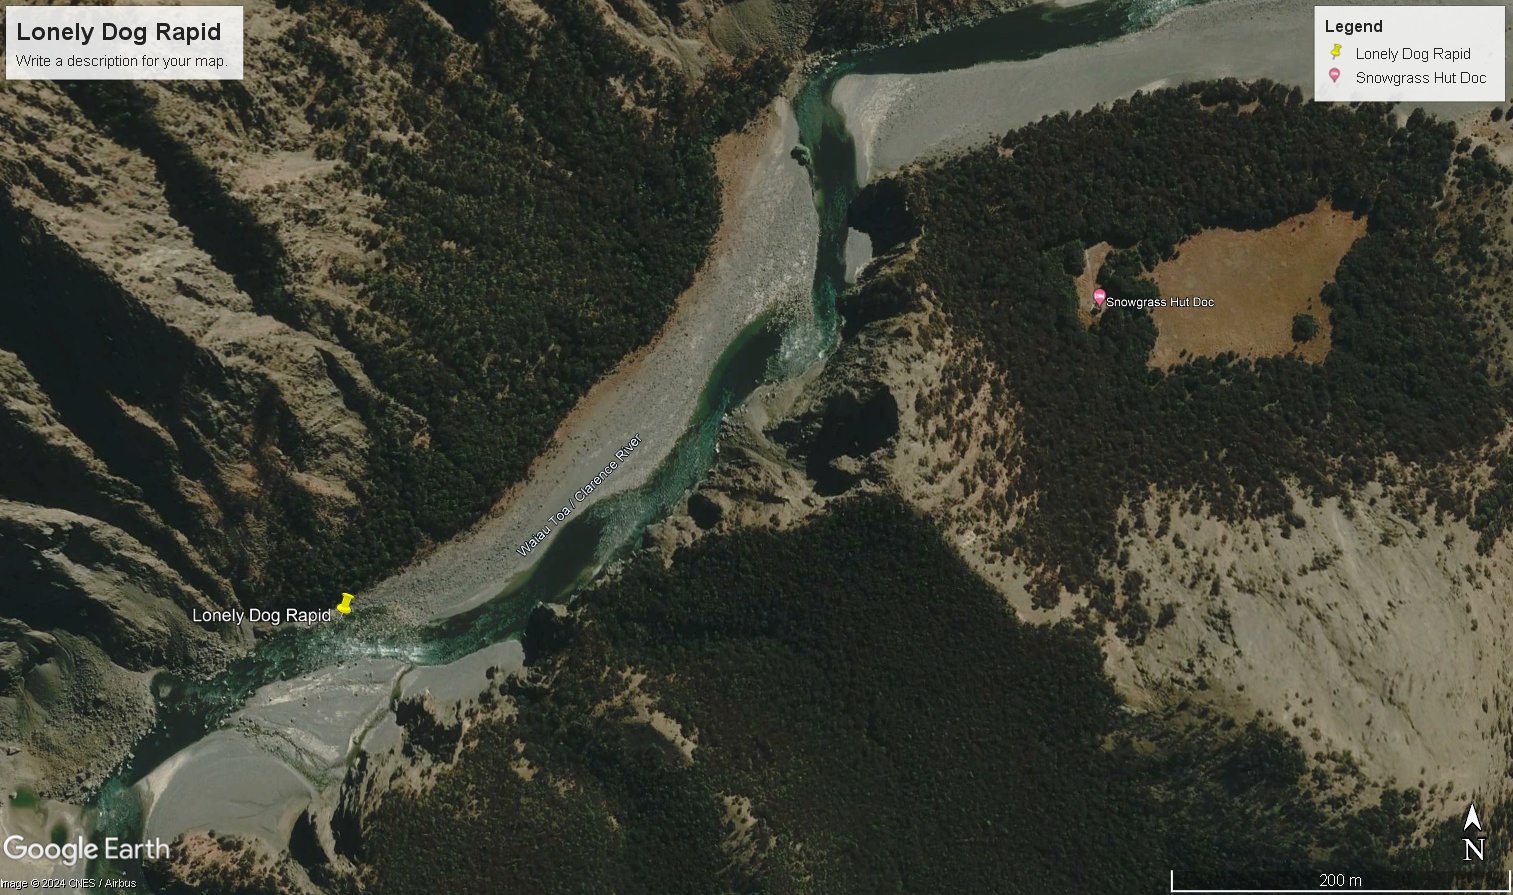
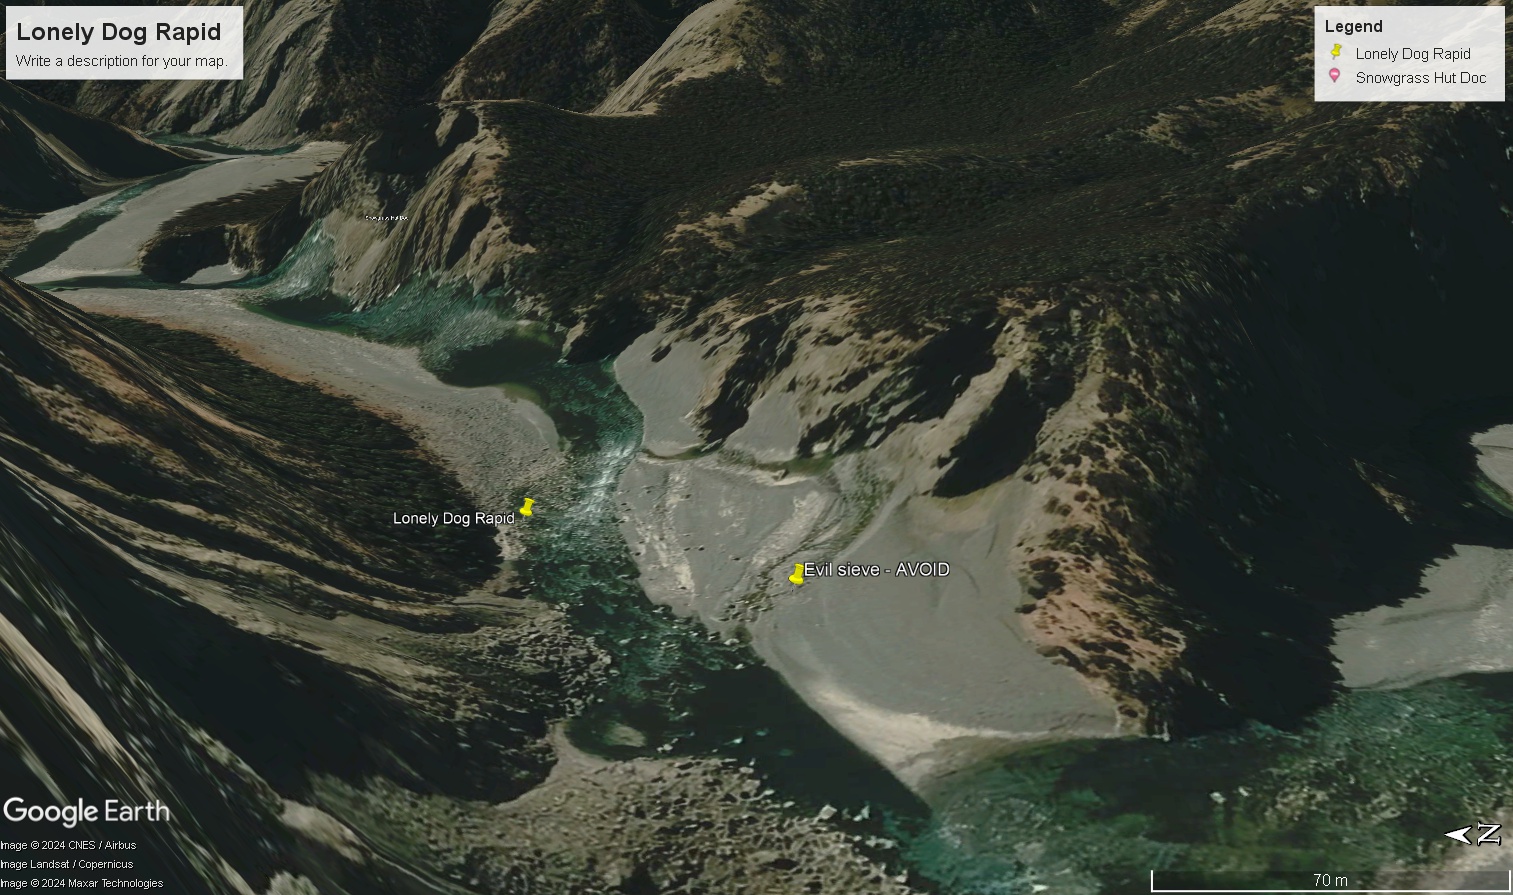
The commercial rafters have a rule to stay L as you approach this section of river so they can easily eddy and portage.
There are quite a few bouldery rapids and bluffs down to Snowgrass Hut.
For the night: Snowgrass Hut (10 bunks) also has great camping nearby.
Day 4: Snowgrass Hut via Fourth Gorge to Matai Flat (II/III)
River distance: 31km
The rapids continue with the “Nosebasher” reaching grade III at times and being a common portage. View Nosebasher Rapid on the Southern Alps Photography website.
At Gibson Stream there is a beautiful grassy flat offers good camping (but no hut). Soon afterwards you’re into the final gorge.
For the night: The most common campsite is after the gorge at Matai Flat in a grove of huge Matai trees. It’s pleasant shade on a good day but a chilly spot outside of summer. A potentially warmer spot is downstream on grass amongst the Kanuka (but check the WAMS database for private land).
Day 5 Matai Flat to SH1 (II+/III)
River distance: 25 km
After Matai Flat, the valley opens out to a broad flood plain with shallow flats and birds everywhere.
After the Wharekiri Stream bluff (Corner Hill) is the Papatea Fault Rapids. These are rated grade III due to the size of the continuous wave trains. The river was diverted north by a massive fault which uplifted the whole valley floor up to 6m at Limestone Hill! This vertical offset of the river floor created a gnarly rapid that over time has mellowed. The river has now eroded upstream and incised a gorge rapid. Immediately after this are the remains of the recently destroyed Glen Alton Bridge, which creates hazards at low flows. This was once a possible exit point. If you want to get out continue downstream a kilometre and exit river left wherever the newly eroded riverbank allows it.
Downstream the steep gradient continues with some nice roller coaster rapids. As you approach SH 1 bridge beware of crap in the river in the form of “sputniks” or “hedgehogs”, large cubes of concrete with railway iron sticking out. These are hard to see in the cloudy water. The old bridge abutments are a more obvious hazard. View River Debris Common near SH1 on Southern Alps Photography
You can take out just below the SH1 bridge on the river left, or continue past the railway bridge to the sea (take out on river right). You can meet Kahawai and dolphins here, making this a rather exotic completion to a long river journey.
More photos
A number of excellent photos of this trip can be found on Danilo Hegg’s Southern Alps Photography website. Bear in mind that Danilo’s trip was in 2014, two years prior to the 2016 Kaikoura earthquake which changed the river in many ways.